HOW TO BUILD A WEBSITE
The first step to become a website developer or just to design your first website involves passion and commitment. This is very key to achieve any success or brake through in life.This article will introduce how to build a website and what you need to design a website to you While the bulk of your website’s design is ultimately up to you, there are some critical things to do—and avoid—when creating a website.
CHOOSE A PLATFORM TO BUILD YOUR SITE WITH
The first step you need to take towards building your own website is to decide on which platform you want to use and build your website. You can either decide to use a website creator that offers Free hosting service such as wordpress, blogger, wix or you code your own html this requires the knowledge and good use of both HTML and CSS.If you are planning to develop a blog, company website or a personal page, you will need to choose one of the following:

If you want to build an online store you need to choose one of this:

Although you can now use wordress to build beautiful and functional online store since the introduction of woocommerce plugin.
If you want to build your own site (and not an e-store), then the best option for you is WordPress because it’s the most popular and user-friendly CMS of all.
You can use WordPress to build your blog, company website, landing page, portfolio or a personal page.
HOW TO DESIGN A WEBSITE USING WORDPRESS
The easiest way to design a website is using WordPress templates and the first thing you need to do is to pay for a good hosting service such as HOSTGATORS. You can click the link below to get an hosting account with them.
After paying for your hosting. You can easily install wordpress from your hostgator account and option 2 is to install the template, visit the WordPress admin panel located at the following link: [replace with your website.com]/wp-admin

To log in to your account, use the username and password that you chose when you installed WordPress through your hosting provider admin panel.

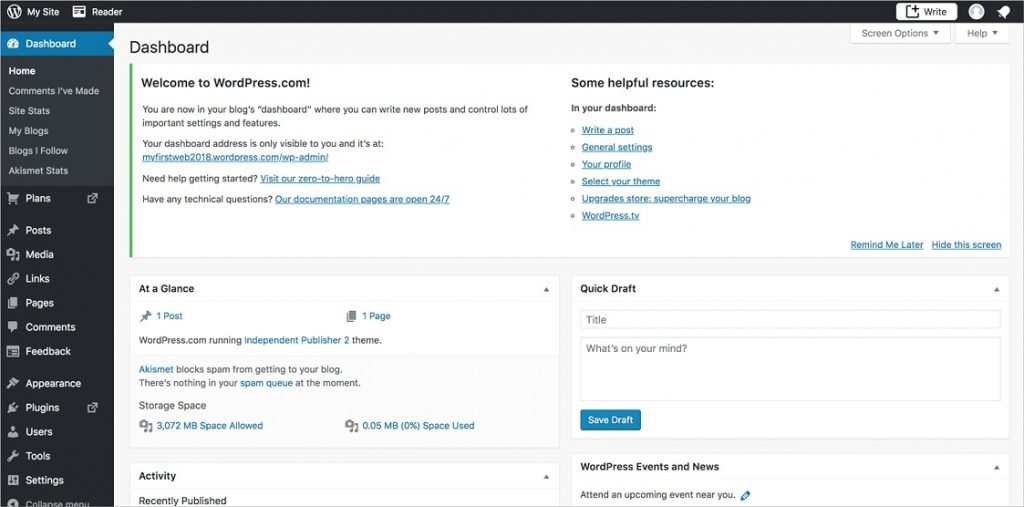
The WordPress admin panel (also called the Dashboard) looks like this. You can see all the sections on the left and the window on the right will display all the settings you can work with.
wordpress dashboard how to design a website wordpress tutorial
To begin, you need to change the theme. For this article, I decided to use the Monstroid² theme. The reason is simple: Monstroid² is a multipurpose theme, so it usually works for all kinds of website topics.

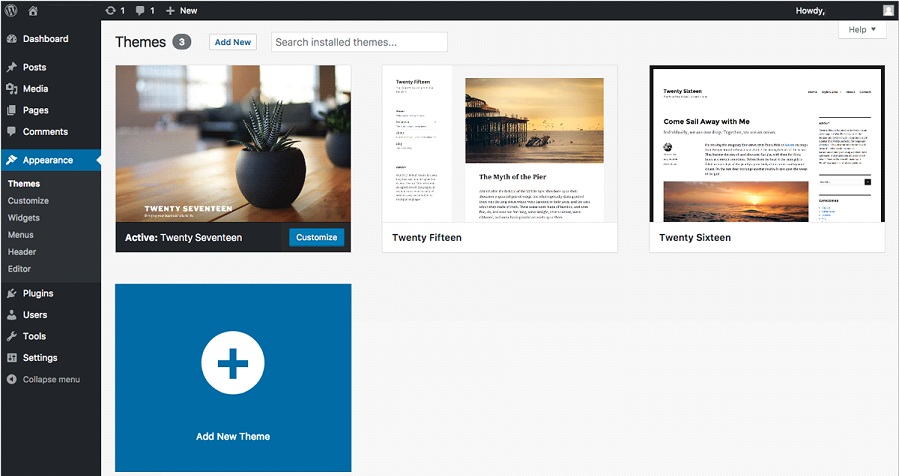
In order to change the WordPress theme, you should click on Appearance and click on the Themes menu option.

This option will redirect you to the page where all the installed themes are listed, but we are not interested in these as they look boring!
In order to install a new theme, you should click on the Add New Theme option and upload the template you want to use.

After the installation process, click on the Activate button to apply the changes and set the new theme as the default one for your website.
Once activated, the WordPress admin will show you a tip right above the templates area. It will recommend you install the TM Wizard, which you should use.
The TM Wizard will offer to start the skins installation process. Simply click on the Start Install option and proceed to the next step.
wordpress tm wizard how to design a website wordpress tutorial how to install a wordpress theme in 20 steps
The wizard will check if all your system settings are optimal and will notify you if something is wrong. When you see that everything is in green, just click the Next button to proceed to the next step.
Next, you will see a list of all the available skins. This where you should decide which skin works best for your needs. As already mentioned, you should select the default one, so just click on the Select Skin button under the Default option.
Next, you will see two options: the Full and the Lite installation option. The Lite one can be used in the case your website hosting package doesn’t provide a lot of space. By choosing the Lite installation option, you agree to get less space for blog posts and other demo data.
If you selected BlueHost as your web hosting company, you don’t have to worry about this part. Just proceed with the Full Installation option—it will work perfectly fine for you. Now the Installation Wizard will download and install all the necessary plugins.
In order to install demo data, you should agree that you want the sample data to replace the existing data on your website. Basically, this warning was added just in case you are installing this theme on your website where you have lots of old content. This is the point where you should consider saving your data.
Since your WordPress website is new and doesn’t have any data, you shouldn’t care whether your posts will be replaced or not, so just select the “Replace my existing content with demo content” option.
WordPress will not allow you to perform this step without entering the admin password again. This is because such important decisions should be confirmed on your side before proceeding.
It may take some time but the Wizard will import all the sample data for you and make sure your website looks great and operate as needed.
Once everything has been installed, you will get a website that looks exactly like our demo unit. All your data will be imported there.
Now it’s time to start the customization process, which simply entails inserting your own information and images. If you don’t want to buy themes, you can also try free WordPress themes.
YOU CAN CONTACT US AT REALTEKWEB TO DESIGN A BEAUTIFUL WEBSITE FOR YOU


 WhatsApp us